Wednesday, December 28, 2011

The Best Meals of 2011

Best Meals of 2011:
2011 was another big year for me in the kitchen.  I made a ton of meals. Looking back, I was really happy to see that so many Vegetarian meals made my favorites list. All in all, I had a blast in the kitchen this year.  As always my goals are to get the tastiest, most creative and quickest meals on the table and I think all of these recipes show that I accomplished that.  Enjoy!

Vegetarian:
I originally saw this recipe while searching "eggplant" on pinterest.  What I got was a link to a blog called "What the hell does a vegan eat anyway."  I liked her recipe, but in true Lizzy fashion, I kept digging for more recipes that sang out to me.  In the end, I mixed several recipes into one.  But the steps were pretty much the same.  Slice eggplant, fry eggplant, make a remoulade, make a slaw, combine on hearty bread. Eat.  Enjoy.

 I made Giada's Butternut Squash Lasagna.  I changed some of this recipe by making my béchamel sauce a bit healthier- using fat free milk and roasting the squash instead of boiling it.  So if you are looking to do something fun with butternut squash, make this recipe.  It has a bunch of steps and takes a bit of time, but it is easy to make and delicious to eat!

I first saw this on Cara's blog and knew I had to make it.  I love thai inspired dishes with peanut sauces but I don't like peanut butter on it's own (crazy I know)!  This dish combined some of my favorite ingredients: spice and kale!

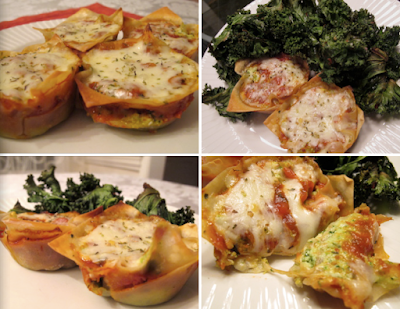
In March I had a week that I used Egg Rolls for every meal.  I fell in love with the idea of making Lasagna Cupcakes.  I really love everything in miniature form.  I combined Arugula Pesto into the Ricotta Mixture to make a vegetarian lasagna. 

In February, I had a week of making non-traditional burgers.  Burgers that leave you feeling good inside, not guilty.  These spicy black bean and corn burgers were so easy to make.  I added salsa and avocado on top and loved every bite.

 Most of you know I'm pretty obsessed with Kale.  I have no idea where I got the idea but  I thought to make Kale Pesto.  Then I googled it and found an awesome NY Times recipe I really don't think I'll make any other pesto ever again.  This was so perfect!

Fish:
When I got beautiful strawberries from my CSA,  I decided to turn these strawberries into the best avocado salsa I've ever had.  Mixing creamy avocado with luscious fruity strawberries with lime juice, red onion and jalapeno and you get a salsa that is seriously delicious. Then combining that with flaky cod on a whole wheat tortilla with a bit of feta and cilantro makes the perfect, unexpected fish tacos.

I made two mussels dishes I was really proud of... Dave and I order mussels all the time at restaurants so it was super fun to make these at home.

I loved the spiciness of this dish mixed with several other kinds of seafood.  
This is a dish I must make again!


I loved the idea of crusting the fish with tons of spices and then (lightly) frying the fish.  I only used 1 tablespoon of canola oil so I'm going to call it sauteing.  

Creative Pizzas:

I used my CSA arugula to make a pizza that combines salty (prosciutto) and sweet (figs).  Definitely one of my all time favorite combinations.

Mini Pizzas on CSA Zucchini!  Can't beat it.  This would make a really quick and delicious, easy appetizer!

This is a health-i-fied version of CPK's version and I loved every delicious bite.  I was shocked by how much flavor this pizza had.

Meat Dishes:

Escalating meatballs to the next level by adding tiny mozzarella balls.  They ooze out flavor and cheese, can't beat that!

I've made this dish twice now and it's my favorite special occasion meal.  The meat falls off the bone and it's so deliciously tender.  Combined with swiss chard and pearl onions over mashed potatoes, this is a VERY special meal. I made it last year for New Years dinner!

I served my chops with a curried sweet potato puree and added the tangerine chili sauce on top.  I also served this with a Blood Orange, Sweet Potato, Avocado, Feta and Arugula Salad, inspiration from Epicurious...


So as you can see, I cooked tons of delicious meals in 2011.  I hope you enjoy and take inspiration from these dishes.  I strive to make delicious tasting meals in a short amount of time while using the best produce and meats I can find.  Let me know what you think!

Which one of these dishes would be your favorite?

Sunday, December 25, 2011

Merry Chrismakkah!

From our house to yours, we wish you a very Merry Chrismakkah!
Enjoy your day and take time to reflect on the important things in life: 
love, health and of course, FOOD!

Oh, and I've been busy the last couple days... 
 With a trip to the gorgeous Mt. Washington Resort in Bretton Woods, New Hampshire....

And the arrival of my new baby nephews: Dante and Enzo!

My sister-in-law had her babies Thursday morning.  Healthy and happy, these babies are too cute : )
 Born a bit early at 36 weeks, these babies entered the world in between Hanukkah and Christmas.  True Chrismakkah babies : )

I'm off to the hospital to visit more and then celebrate Christmas with my husband's family.

Hope everyone has a lovely holiday!

Wednesday, December 21, 2011

Butternut Squash Risotto

You know how on all the cooking shows they say that risotto is one of the hardest dishes to make and virtually impossible to get done in under an hour?  Well I disagree. I had this dinner on the table in forty minutes and my rice was perfectly cooked. You could easily make this during a busy weeknight.  Just remember the key to delicious, perfectly cooked risotto is patience.  And patience is not my strong suite so if I can do it, so can you! 
I've made Butternut Squash Risotto before, but this time I decided to use squash puree (or you could use pumpkin) instead of squash pieces. This turned the dish an orangy color and added tons of flavor.  I topped mine with Chicken Sausage, parmesan cheese and a sage leave for presentation : )

If you've always wanted to make risotto but feared it was too difficult, this is the recipe for you!

Butternut Squash Risotto
Ingredients:
1 quart chicken stock
1 cup of water
1 onion
1 tablespoon of minced garlic
2 cups of Arborio rice
1 box of cooked frozen butternut squash
nutmeg, a dash
1 spoonful of Earth Balance or 1 tablespoon of butter
1 cup of Parmesan Cheese
1/4 cup of mexican blend cheese
5 sliced cooked chicken sausage
sage leaves for garnish (totally optional)
Instructions:
Bring 1 quart of stock plus 1 cup of water to a simmer in a sauce pan, then reduce to low.  The key is to keep your stock liquid warm.
Heat a medium skillet over medium heat with olive oil and once hot add the garlic and onions.  Add rice and toast for a few minutes.  {If you can drink unlike me, add a 1/2 cup of your favorite white wine and let cook out completely.} Then ladle stock in intervals and mix thoroughly and allow the liquid to evaporate. This is where patience comes in handy.  I probably ladled in 10 scoops of liquid before the rice was ready.
In another dish, saute your chicken sausage until lightly browned. Repeat until the rice is cooked and your liquids are gone. Defrost the squash in your microwave in a dish to collect any liquids and then add it to your risotto mixture once the rice is cooked through.  
Then season with salt, pepper and nutmeg.  I found that I needed more salt than I expected.  Taste as you go! In the last few minutes of cooking, add the cheese and butter or earth balance.  Serve warm and top with the sausage, another sprinkling of cheese and a sage leave.

 I've been eating the leftovers for the last few days and everyday I love it even more!  Such a delicious, easy meal.  I hope you make it!

Tuesday, December 13, 2011

Quinoa Chili

I've been on a kick lately with re-making recipes from my own blog.  Ever since I made Quinoa Chili on my blog last February I've been wanting to make it again.  But I love cooking different things so I haven't gotten around to it.  Until last week.  Feeling quite a bit guilty from all the sweets I've been eating, I knew I needed a vegetarian dish that I could feel good about.  And if you want to get this on the table in under a half hour, cook your quinoa the night before!  I love the prep-ahead method and try to take advantage of it as often as possible.
Quinoa Chili
Ingredients:
1 cup quinoa
1 cup water
1 cup veggie broth
1 large onion, diced
1 green bell pepper, seeded and diced
1 cup chopped celery
1 jalapeño pepper, seeded and minced
2 tomatoes, cored and diced
1 cup diced carrots
Two 16-oz. cans black beans, drained
One 28-oz. can crushed tomatoes
1/2 package of McCormicks Hot Chili Seasoning Mix
salt and pepper to taste
1 Avocado, sliced and a sprinkling of Mexican Blend Cheese
Instructions:
Combine quinoa and water/broth in saucepan, cover and bring to a simmer over medium heat. Cook until liquid is absorbed, about 15 to 20 minutes. Remove from heat and let stand about 10 minutes.Meanwhile, heat a large, non-stick pan; add onion, bell pepper, celery and jalapeno. Saute 7 minutes over medium heat. Stir in fresh tomatoes and carrots; saute 3 to 4 minutes. Stir in beans, crushed tomatoes, and seasonings; cook about 25 minutes over low heat, stirring occasionally. Stir in quinoa; cook 5 minutes more. Ladle chili into bowls and top with avocado and cheese.

This meal came together so quickly and tasted so good! I definitely recommend this quinoa chili if you are looking for some chili inspiration this winter.

What's your favorite way to use quinoa?

{Boston Blogger Cookie Swap}: Hot Chocolate Cookies with Toasted Marshmallows

On Sunday Shannon hosted her annual Cookie Swap and I finally made it to the party!  I've been thinking about what to make for quite awhile now and decided on a recipe I saw in my google reader for Hot Chocolate Cookies.  I've seen this recipe a few different places: Dine and Dish, Baked Bree and Tasty Kitchen to name a few.  But the one that really called out to me was from Baking Serendipity.  The reason?  She not only used marshmallows in her recipe... but she toasted them under the broiler first! Genius!  Of course, in true Lizzy fashion I combined a couple of these recipes together to form my own.
Now before I tell you about the recipe, I should mention that I made these cookies with the help of my friend Meg Saturday night around 9pm.  And... well... we almost burnt the house down.  Just so you all know you cannot use WAX PAPER in the same way you would a silicon sheet or parchment paper.  If you do, you may open your oven mid-way through cooking and smoke will take over your house.  Consider yourself warned.  What can I say?  I'm a baking novice.  Too much science to this game : ) But the cookies did not burn!  We salvaged them and well, they are amazing.

Hot Chocolate Cookies
recipe adapted from the sources above
Ingredients:
2 sticks of butter, at room temperature
1 cup of granulated sugar
2/3 cup of brown sugar
2 eggs
1 tsp of vanilla
3 1/4 cups of flour
1/2 cup of Hot Chocolate Mix (I used Ghiradelli)
1 tsp of salt
1 1/4 tsp baking soda
1 1/2 cups of semi-sweet chocolate chips
1/2 cup of white chocolate chips
1/2 cup of chocolate chips
1 bag of marshmallows, (use mini if you can, I couldn't find them), toasted
Instructions:
Preheat oven to 350 degrees. Cream the butter and sugars together until smooth.  Then add eggs one at a time and beat in the vanilla until combined.  In a separate bowl, combine flour, hot chocolate mix, salt and baking soda.  Add to wet ingredients in 3 or 4 steps.  Stir well. Toast the regular or mini marshmallows under the broiler with aluminum foil until they start to brown (pay attention!).  Fold the toasted marshmallows into the dough with the different kinds of chips.  Chill the dough for about an hour. Drop the cookie dough by the spoonful onto a baking sheet lined with PARCHMENT PAPER (NOT WAX PAPER!!!). Bake for 9-11 minutes.  Then cool and transfer to a wire rack.


I loved the little bites of toasted marshmallow and the over-abundance of chocolate in this recipe!  And my cookies were perfectly soft- I somehow didn't burn the bottom!  By the last batch I learned that the key to making delicious cookies is to make them REALLY small.  Maybe I should invest in that whole cookie scoop things....

Anyway, these were not the only cookies at the cookie swap.  There were tons of delicious treats!
Bridget's Butterscotch Brownies
Elizabeth's Nutella Oatmeal Cream Pies!
I loved these- reminded me of Little Debbie's Oatmeal Pies from my childhood.  Cannot wait to make these at home!
Melissa’s Chocolate Mint Cookies
Kerstin’s Spiced Caramel Pecan Bars 
Ranjani’s cranberry caramel bars

All pictures below were taken from Cara... She is a much better photographer (and has a better camera) than me!

Joanne's Rainbow Cookies
Cara's Cinnamon Coffee Pecan Cookies and Chocolate Mint Chocolate Chip Cookies 
Lauren's Better than Crack Brownies 
Our hostess Shannon's Pumpkin Blondies and Pumpkin Oats Cookies 
Oh and my cookies again : )  I also made Andes Mint Chocolate Chip cookies as well...

So many delicious cookies to enjoy! Here's a group shot of the bloggers at the party.
Back row: Shannon, Joanne, Kerstin, Ranjani and Elizabeth
Front Row: Bridget, Me and Cara!

And wow, I definitely overindulged quite a bit this weekend.  So much so that my weight gain and how I'm feeling about it all prompted a depressing post on my baby blog. I almost posted on this blog but decided I was being irrational and way too hard on myself.  After some great emails from one of my favorite bloggers Dorothy, I realize now what's important.  So what if I've gained more weight than my other friends who are due around the same time as me.  What's important is realizing the real goal, the real finish line: having a beautiful, healthy baby.  

And with that I'm going to take Dorothy's advice:
"The people who gain weight during pregnancy and don't have it come off are people who aren't active, who aren't healthy and who aren't motivated. You are all of those things. Don't read too much, don't think about it too much - just enjoy the next 20 weeks. Honestly what's a little weight when you have a human growing in you."

She is right. And I feel like a completely different person now than the girl who cried last night trying on dresses feeling too fat.  I forgot about the big picture. And I won't allow myself to do that again!

I apologize for the slight tangent... we were talking about cookies right?
What's your favorite cookie to bake?

Saturday, December 10, 2011

Salmon Avocado Stackers

This week I decided to take inspiration from my own blog for weekly dinners. I haven't gone back and cooked something twice in a long time so I figured it was about time. One of my favorite and quickest recipes is Salmon Avocado Stackers with Avocado Butter and Arugula.  I used Pumpernickel bread last time I made these, but was super excited to try the Arnold Pretzel Rolls I found at the store.
These sandwiches are really simple to make and only involve 6 ingredients + salt and pepper. I think that's pretty impressive.  It's easy to prepare on a busy weeknight and leaves you feeling satisfied without feeling guilty since it's pretty healthy!  I know there's 1 tablespoon of butter and carbs but I think it's a really delicious dinner...
This epitomizes my favorite ingredients- Salmon, Avocado, Arugula, Carbs...

Salmon Stackers with Avocado Butter
(yes there is butter, 1 tablespoon and yes it makes a difference!) 
Ingredients:
Pumpernickel Bread Toasted OR Arnold Pretzel Rolls Toasted
1lb of Salmon
1 handful of arugula
1.5 ripe avocados
1 Lemon
1 tablespoon of butter, slightly melted
Salt and Pepper
Instructions:
Toast the Pumpernickel Bread or Pretzel Bread in the toaster. Meanwhile, place a nonstick skillet over medium to high heat.  Spray with cooking spray.  Sprinkle the Salmon with Salt and Pepper and cook until cooked through about 3-6 minutes per side.  (I cooked with skin on and removed it after, or you can choose to remove skin first, either way works) Meanwhile, place the avocados, lemon juice, butter, and some salt in a food processor and give it a whirl.  Process for :30 seconds until smooth.  You may need more or less lemon depending.  Taste as you go!  (You will also probably have extra sauce... I always do!) Take out the bread/roll out of the toaster and spread the avocado butter on both sides. Then add pieces of the salmon and arugula and close the sandwich and enjoy!


Serve with a side Arugula salad and dinner is complete in minutes!  Screw 30 minute meals... you can get this on the table in 15, tops.
 I hope I've convinced you to try this sandwich out... I think it has a nice balance to it with the lemon, avocado, arugula and salmon.  The pretzel roll just added more flavor, but any bread of your choosing would work.
What's your GO-TO quick, painless dinner that you can get out on the table in less than 20 minutes?  Show me links!

PS- I'm almost halfway through my pregnancy!

Thursday, December 1, 2011

Brined Turkey with Chipotle Maple Butter Gravy

So maybe you're all turkied out and maybe this isn't the best timing for a "How-To" on Turkey's, but I wanted to get this recipe up here on my blog.  Who knows, maybe one of you will make a Turkey for the other big holiday we have coming up THIS month... Hanukkah.  Oops, I mean Christmas. Either way, it's a recipe worth having!

When I tell you the turkey dipped into the Chipotle Maple Butter Gravy was the best thing I had this Thanksgiving, I'm not kidding.  It was delicious in every way and pretty simple. And usually I'm not even a huge fan of turkey!

First, I believe the key to the perfect turkey is brining.  Every year Dave and I say we are going to create our own brine, and every year we find it easier to just buy it from a store. Yep, cheat when you can people.  Plus, for 12 bucks, you get all the spices you need AND a bag to brine your turkey and liquids in.  Easy Cleanup!  I bet it would cost at least 12 bucks to buy all the spices you need for the brine.
In this brine mix, according to the Crate and Barrel website, you get: 
  • salt, sugar, orange peel, spices, juniper berries, shallots and pink peppercorns

Crate and Barrel Instructions: And all you do is an overnight soak in our own seasonal brining blend transforms the holiday turkey. The requisite salt and sugar base produces the moistest, juiciest meat, while the inspired choice of spices imparts the flavors of orange peel, juniper berries and pink peppercorns. Heavy-duty brining bag included.


There are directions that come with the packaging.  But for the most part you just mix your spices with water or broth over heat.  Once combined, you cool it overnight.  We did this on Tuesday night.
Wednesday morning we removed the giblets bag from our turkey, added the turkey to the brine bag and then added the brine mix.  We put that in a huge cooler and left it on the deck. Then Wednesday morning we were ready to cook!  After taking the turkey out of the brine, rinse and put dry.
Before we cooked the bird, I had to make some flavored butter.  The first butter I made was a Chipotle Maple Butter.  After I made it, I spread some on a piece of bread and fell in love.  But I got worried.  I got worried it may be a bit too advanced for the palettes that were coming to dinner. The recipes below are all adapted from Food Network Magazine- November 2011.

FLAVORED BUTTERS:

Chipotle Maple Butter
Pulse 2 sticks of softened butter in a food processor with 1/4 cup of maple syrup, 1-2 chipotles in adobo sauce (depends on heat level), 1 garlic clove and a pinch of salt.  Process that up and reserve for the Gravy. You will have lots leftover!


I saved all of it and decided to make a classic herb butter for the actual turkey itself.

Classic Herb Butter
Mix 1 stick of softened butter with parsley, sage, thyme, rosemary, teaspoon of pepper, shake of paprika and salt.  Process that up.  Spread it under the turkey skin and on the breasts and legs.  Then rub the rest on top of the skin.


Cooking the Turkey
Put the oven rack in the lowest position and preheat the oven to 350 degrees. Put the turkey breast side up on a rack in a large roasting pan, tucking the wings under and tying with twine.  Tie the drumstick together as well.  Put tinfoil over and cook for about 15 minutes per pound.  We cooked for about 3 hours with the foil and an hour or so without.  We also added chicken broth to the pan and basted the turkey throughout the cooking process.  Roast until the skin is golden brown and a thermometer inserted into the thigh registers 165 degrees.  Then Transfer to a cutting board and let rest for a bit before slicing.  

Okay, now let's move on to the gravy.

Classic Turkey Gravy with Chipotle Maple Butter
FOR THE BROTH:
2 tablespoons of unsalted butter
1 medium onion
1 leek
Neck and Giblets from Turkey (I omitted this because my husband had already throw it out...no biggie)
8 cups Chicken Broth
A Bundle of Aromatics- Sage, Thyme, Parsley
FOR THE GRAVY:
Turkey Drippings from your roasting pan
1/2 cup of flour
salt and pepper
a couple tablespoons of Chipotle Maple Butter
Instructions:
When turkey goes into the oven, start the broth: melt butter in a large saucepan over medium-low heat.  Add onion/leek (and turkey giblets and neck if you have them) and cook until browned about 15 minutes. Add the broth, herb sprigs; cover and simmer while the turkey roasts, about 2 hours. Strain broth and keep warm.
When turkey is done, transfer it to a cutting board and pour all the pan drippings into a degreasing cup.  Add 1/2 cup of the prepared broth to the roasting pan and scrape up the browned bits with a wooden spoon. Add bits and liquid to a degreasing cup. (I didn't have a degreasing cup, so I just used a measuring cup... the fat will rise to the top... so after it does that, use your baster to remove the fat). 
Next, make a roux.  I did this in the same pan I had my broth in all day.  I added a bit (maybe 3-5 TB of the chipotle maple butter and flour together until the flour browns slightly.  Then I gradually added the broth back in whisking constantly to avoid lumps.  Bring to a boil and then reduce to medium low. 
 Season with salt and pepper and add more butter in if necessary (I think necessary).
Enjoy the best gravy of your life.

You're welcome.

What's the best gravy you've ever made/had?